
"You Melt My Heart"...
Last year I made the decision to start a "My Favorite Things" list...just in time for Christmas. This year I've found a couple of more things to add to my list. I'm calling it "Great Finds of '09"! :o)
First, Martha Stewart's paper trimmer. Cuts like butter! And the best part? It cuts STRAIGHT!! I should probably state that I have tried many paper trimmers over the years, but this one is by far, the best that I have found! Another feature I love is that it has an arm that you can "set. Here is a great video demonstrating that feature.
http://www.youtube.com/watch?v=kC54B5a6bIs
The only con of this trimmer is that it only goes up to 10 1/2 inches. Not a huge issue in my opinion because most times you're cutting down a 12x12 page anyway.
Another great find is the Martha Stewart border puches. There are two that I absolutely fell in love with. One is the "Punch around the Page" loop border/corner set. There are many other designs that are available all the way from whimsical to the most elegant designs.
http://www.youtube.com/watch?v=7p1p5yV2NpI
If you haven't heard of the Drippy Goo punch, be sure to check that one out too. It's been on the market for awhile. It was a "must have" item last year but this year, you can probably find one at your local Walmart. You can use this punch in sooo many different ways on cards or layouts: icing for cake; drippings from an ice cream; icicles. Lots of fun ideas! If you look at my calendar pages below, for the June page, I used this punch on the photo mat. Isn't it cute?
Aleene's Tacky Glue Pen is another wonderful product. What makes this glue pen different than others, you may be asking? It's refillable!! Last night I spent less than $3 for a huge 16 FL. OZ bottle of Tacky Glue at Walmart...which will last me a looong time! I also love that this glue pen has a fine tip which allows much more control with tiny embellishments.
**If you haven't already, check out my archived Money Saving Tip on how to make your own glue dots using Aleene's Tack It Over and Over. It's another great product that will save you some money.**
And one more thing: Whether you're a card maker or an avid scrapbooker, my best find so far has been the Cricut machine. No words can express how much I love my machine or how much use out of it I've gotten. It was well worth the investment and I highly recommend it. It will help you make beautiful pages in a fraction of the time...and it's incredibly user friendly!!
Hope these suggestions help with your Christmas shopping!
I love Christmas. My favorite time of the year!! There is something so wonderfully magical about seeing all the beautiful lights and most of all, knowing the true meaning of the season.


I think the August page is my favorite. I just love all the bright colors and the cute umbrella! And lots of bling throughout which is incredibly Shelley-like! LOL If any of you are wondering, most of the embellishments I used for these pages were made with the Cricut (using many different cartridges).
Thanks for looking! Wishing all of you a fantastic week!!
Thought I'd share a picture of what I created tonight. I'm sure most of you by now have seen the huge fun diecuts at the Shoppe. Well, I bought three of them. One for a layout of Bailey (our Westie). The other two I intended to layer to make a layout of Muffin.

Very cute, but a little plain. Now, let's see what a little ink, chalk and some bling can do:
Okay, so I see now that the dog is turned the wrong way in the first picture. Oh well. You get the idea. LOL
All I did was simply buy two diecuts...one in light brown and one in dark. I cut pieces out of the darker diecut and glued them on top of the lighter brown dog. Very, very easy. In fact, the diecuts have little detailing/slits all over it, which can serve as a guide on where to cut.
Hope this inspires you to create something fun of your own!!
Have a nice weekend everyone!
 The birds on this actually have feathers!! Sooo cute!! Great for pictures of friends... or this would even be perfect for a fun spring time/Easter layout. Class is from 10:30-12:30 this Saturday and kits are available if you're not able to attend. Don't miss out~call today to reserve your spot! 706-321-0202
Hope all of you had a wonderful Thanksgiving with your loved ones!!
There is still time if you'd like to sign up for the next in our Sesame Street series. This class project features Elmo, along with his cute gold fish Dorothy! Class is scheduled for this Saturday, December 5th from 1-3 p.m. (kits are available if you're not able to attend that day). Please register by calling 706-321-0202.
Also, just a reminder for all classes: If you register and find you are not able to attend the day of class, please, if at all possible, call to let us know. This ensures that classes can start on time and that the instructors are not having to put kits together at the last minute. Thanks so much!
Now, on to the fun! :o) Here is what we will be making:

In case some of you will be attending the "Elmo's Green Thumb" show at the Civic Center, I decided to incorporate some cute sunflowers into this layout. If you haven't heard about Sesame Street Live coming to Columbus, you can get all the details here:
http://sesamestreetlive.com/shows/elmos-green-thumb
Hope to see you on Saturday!!
Anyone who knows me is quite familiar with how much of a dog lover I am. And this weekend while at Petsmart having Bailey and Muffin groomed, I discovered the sweetest furbaby there in a cage. Her face absolutely melted my heart.
Her name is Lola and she is a Lhaso Apso. She is beautiful beyond words. I would have adopted her in a second, except she suffers from seizures, and being in a wheelchair, I don't think I can give her the care she would deserve. But I can tell you about her in hopes that someone here can be that loving home for her. The people at Safe Haven animal shelter have told me the medication she needs is cheap...about $10/month. (I believe it was Safe Haven. If not, you can ask the people at Petsmart...the workers wore dark green shirts and were located near the fish dept.) The number for Safe Haven is (706) 582-3629. The number for our local Petsmart is 76-323-6788.
Please, if anyone reading this is looking for a pet, I hope you'll consider adopting her. And if you do, I would love it if you left me a note. Knowing this precious doggie got her forever home would absolutely make my Christmas!!
In case some of you reading do not receive the Shoppe's newsletter...or even if you do, I thought I'd put a little reminder on my blog about the great deal Cheryl is offering for Black Friday.
Every gift certificate purchased on Friday, November 27th (from 10 a.m. to 12 p.m. only!) will receive an extra 10% upgrade! So for example, if you purchase a $25 gift certifcate, you will get $27.50 instead. How great is THAT???
If any of you are participating in the Secret Sister swap at the Shoppe, what a fantastic idea for an end of the year gift! Or, perhaps you have a friend who likes to scrapbook. Heck, considering the upgrade, it might be worth it to even purchase one for yourself! Who doesn't love a little extra spending money...to you, from you! :o)
And ahem...now that I've done my own personal shopping...lol
If you haven't had a chance to drop in lately, Cheryl has some gorgeous new Christmas papers and embellishments in stock. Some have an elegant, vintage touch...and others are just as cute as can be! Just go to the back of the store in the holiday section to check out all the pretties for yourself. I can guarantee you, you're not going to want to miss out on any of it! And if you're working on layouts after a fun-filled Halloween, there is still a great selection of adorable papers for that as well!
Wishing all of you a wonderful weekend!
Found this in my online travels and thought some of you might like to try it. There is this wonderful website called Scrappin Blogs that has all kinds of beautiful templates either for your blog or...your FACEBOOK page!! Yes folks, you can now customize your Facebook profile however you would like it. There are all kinds of themes from military, holidays, babies, adoption, animals, flowers...you name it and I'm sure you'll find it there!
http://www.scrappinblogs.blogspot.com/
It's very easy. For your blog, they give you codes for you to add as a html code (under "gadgets").
To use on Facebook, on the right hand side of the home page, you will find "How to use our layouts on Facebook". Click on that. On the next page that comes up, there will be tons of backgrounds for you to choose from. They are on the left hand side of the page, categorized according to theme. Now there is one catch. You will have to download the application to be able to use this. Have no fear though...it's free and they walk you through each step from start to finish.
If you do not see anything you like on these pages, you also have the option of choosing a layout on the main portion of the blog. To do this, you will have to copy and paste the link code they give you there. For each layout there is a designated Facebook code (it's under the picture of each layout). Highlight the FB code of the one you like, hold down your Control button and push c (for copy). Then click on the "How to use our layouts on Facebook". On the next screen, you will see a big green button that says "Create Your Own Background". Click that. You want your background color to be white, so choose that. The next screen will be where you put in your link. Click on the empty box. Hold down the Control button again and push v (paste). Once your link code is written in that box, hit the "load button". Then, next step. Choose the color for the font you would like. (I usually just choose black as I find it to be the most versatile). Next step again. Add a layout name if you want...I never do. Then, hit the save and publish button.
When you go to your FB page, you may have to reload it to see your updated background. Now not only will you have a gorgeous background, but you can also see the ones your friends may have!!
Enjoy!
I would like to start out by wishing my Mom the Happiest Birthday EVER!! Love you Mom and hope you are having a wonderful birthday!! xoxox!!
Okay now back to business...
It has been brought to my attention that at least one of the class projects is not on my blog. So, for anyone who ordered a kit for the "Babies are a Blessing" class, here is the class sample:


If there are any others you would like to see that are not currently on my blog, please leave me a message and I'd be more than happy to do that.
In other news...
Last Friday we had a Halloween crop at the Shoppe. There were alot of people who decided to dress up this time, so it was tons of fun! I decided to embrace my quirky sense of humour this year and go as...are you ready for this? "Meals on Wheels"! LOL Here is a picture for your viewing pleasure (or a good laugh...whichever may be the case). A huge thanks to both Cheryl and Bob for their contribution to my costume.

Here is a picture of my taking my friend Kay's order...doesn't she make the cutest witch?? The tulle around her hat had spiders on it!


And with all that excitement going on last week, I still managed to get a couple of sample pages done for the store. Please note: These are not upcoming classes, but rather pages that are featured at the store to give you a bit of inspiration on how to use some of the papers for sale.
I used some cute Pumpkin paper that Cheryl had at the store to make both of these layouts. For the fall page, I used the actual paper. For the "Pirate Princess", I used the pumpkin paper only as a template for the carriage. So, one piece of paper served two totally different purposes.


One other thing before I sign off for now....keep checking back because soon the next Sesame Street class project will be posted here. This time the character of the month will be none other than ELMO!!
Have a great day everybody!!
Hi Everyone,
I hope you're having a wonderful week! I had a few things I would like to mention. First, there is still time to register for our "Cookie Monster" class this Saturday. If you want to ensure your spot, please call and sign up today (706-321-0202). Registration will soon be closing.
The other thing I wanted to blog about is more really an FYI. Last week, hubby and I decided to take a little trip to Panama City Beach for some R & R. Well, one particular store we went to had the cutest pink hat. It had the word "hope" embroidered on it as well as the breast cancer ribbon also on it.
I think that most of us know and maybe even love someone who has been affected by this terrible disease. And so, like many, I love to buy things that hopefully contribute to research. So, I take the hat up to the sales lady and inquire how much of the purchase goes to Breast Cancer research. Now to be honest, that is something I cannot ever recall doing. But yet, I did that particular day. Anyway, to make a long story short, the lady said "Oh, nothing for that item, but we do have these other products where a donation is given."
Now something about that seems wrong to me. I'm all for raising awareness, but I think it's also important that people do not use something like the breast cancer ribbon for simply a marketing ploy. To be honest, it made me appalled as a consumer. I realize changing the rules is probably not within my power. But, I can certainly use my blog to make others aware so that we CAN get the donations toward this great cause and support those companies that DO make this a priority.
I wish you all love, happiness, health and happy scrappin'...
Shelley
I'm back to the blogging world with a fun new tip to share! Glue dots are wonderful for adhering embellishments to our pages. But we all know how expensive they can be when you use a lot.
So, in my online travels, I found a wonderful idea for making your own homemade dots using glue! All you will need is a bottle of "Aleene's Tack It Over and Over", and an old empty sticker sheet from your stash. Some people have tried using wax paper but apparently, it will NOT work for this purpose.
Cheryl just received a shipment of the Tack It today so if you're interested, stop by to pick some up. Each bottle retails for $4.59 and will make TONS of dots! The best part about this is you can make yours any size you like. Maybe even try making some lines to adhere your favorite ribbon to your layouts!
Apply the glue to your sticker sheet as shown. (Make sure you use the glossy side of your sticker sheet so that the glue dots will peel off easier later.) Allow your dots to dry overnight. The dots will turn clear when they are ready to use.
Hope you enjoyed this tip. Be on the lookout for some more great ideas in the near future!
It seems that I have been seriously neglecting my blog and I decided that today was THE day I was going to do something about it. So much to fill you in on...
Hubby and I had a great trip to Canada. It was so nice getting the chance to spend time with our family, friends, and each other. The time went by far too quickly as vacations often do. I have some pictures and will try to share some of those with you at a later time. Right now though, there is other business that needs attending to. :o)
First, the "A Baby is a Blessing" class is completely sold out. However (and here's the good part!), our Cookie Monster pages are now up! "The Cookie Caper" is the second in our Sesame Street series. It features our loveable blue character in Sherlock Holmes attire. His mission: An empty cookie jar means that it's his job to find the lost (or stolen) cookies! Here is a picture of what we'll be making in this class:

This layout is interactive as you can see in the following:
The lid opens up to reveal that the cookie jar is empty. Attached is also an additional photo mat! Please call to register. (706) 321-0202. Our Oscar pages sold out very quickly, so if you're interested in this class, please don't wait to sign up.
And with that, comes another exciting announcement!!!! My wonderful, supportive hubby bought me a Flip Ultra HD camcorder! I'm still learning the ropes with it (as you can tell from the blurriness of my video)~ but so far, I'm loving it. And with any luck, my videography skills will hopefully improve. ;-) In the mean time, your patience is much appreciated!
Expect to see some new videos with FREE online tutorials featured here in the coming weeks! Cards, scrapbook pages...all kinds of fun stuff!! If you would like to subscribe to my blog, you will get notified each time there is an update. I have some great things planned and I can promise you~ you're not going to want to miss out on any of it! :o)
Wishing all of you a great week!
Today I went to my mailbox and what did I see?
A new Sesame Street font cartridge waiting for me!!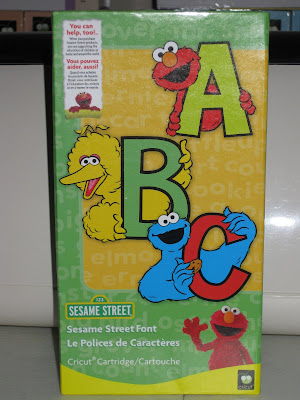
Okay, so the truth of the matter is that I ordered it. But you'll never believe what I paid...$25!!! I wanted to tell you about this because not only is it a fantastic price, but the store owner is such a sweet person and she offers amazing customer service. Even with the craziness of CHA, my catridge was delivered in record time and in perfect condition.
I think letting others know about a positive experience is very important. So, today I wanted to share that info with you. I hope you'll check out her website for any of your Cricut needs.
http://jujubeesscrapbookcorner.com
Thanks so much, Julia!!
Stay tuned for some new Sesame Street creations...
I came across a wonderful article and would like to share it with you. I have heard so many people tell me that they are not creative (which is usually not the case at all!) So, this article comes with a little challenge. Create something today. It doesn't have to be anything to do with scrapbooking or card making. It's whatever you see as fun. God has given us all unique talents and the best way to discover yours is to try something new (or perhaps work with a talent you already know you have). In either case, enjoy the process. I wish you a fun day as you make a little time for yourself!!
Here is a link to what I think are some great words of wisdom:
http://miramichileader.canadaeast.com/community/article/748548
And, as always, I would LOVE to see your creations! So, feel free to drop me a line!
Cricut lovers, have I got a tip for you!!! I found this great idea in my online travels and wanted to share it with you today. I'm sorry that I don't know the person who originated the idea...but whoever it was, he or she is a creative genius!!
Cricut mats can be expensive if you have to replace them often. And with that money, you could be buying more fun catridges! So, this tip will help once your mat has lost it's stickiness.
First, you will need one two way glue pen (make sure it's the one with the jumbo tip). It's by EK Sucess Zig Memory System and looks like this:

This retails for (I believe) $5.99 so if you can use a coupon for this, you would save a little. (You can check http://www.scrappincricut.blogspot.com/ for a coupon). Kendra is a sweetie who is always kind enough to post any coupons that may be available for any given week. It takes her alot of time and effort to do this, so if you do print one off, be sure to leave her a nice comment. I'm sure she'd really appreciate it.
Now for the instructions...Clean your mat using soap and water. Allow it to dry. Because patience is not something I possess, I used a hair dryer (on a very low setting) to speed up the process. :o)
Once dry, you will want to tape off the outer portion of your mat where you do not want adhesive.Starting at the top of your mat, run your glue pen across from one side to the other.

Do this over and over until your entire mat is covered in glue. If you find the glue starts to puddle on your mat, wait a few minutes and then lightly dab that portion with paper towel.
After about 20 minutes, your mat should be nice and sticky. However, if at all possible, it's best to leave it overnight (uncovered) to allow the glue to settle properly. Remove your tape. Then you can cover your mat with it's protective clear sheet again.
Today our Oscar the Grouch class was held. Everyone seemed to enjoy themselves (myself included...all of the ladies are so nice!). We have one kit left over if anyone is interested and it will be on a first come, first served basis (706) 321-0202.
Someone requested the dimensions for the ovals used when creating the frog paper piecing. Since the coluzzle is not marked with exact dimensions, these are about as close as I could get. Hope this helps:
Smaller oval for head: approx. 2 3/8 x 1 6/8
Larger oval for body: approx. 2 7/8 x 2 1/8
Also, just a reminder of our first Sesame Street class featuring Oscar the Grouch! The class is scheduled for this coming Saturday, August 1st. If you would like to sign up, please call (706) 321-0202. Hope to see you there!


Now your frog should look like this:
 Layer your frog's eyelids on top. Draw in mouth using a black pen. Add red dots for cheeks and also his little heart.
5. Adhere your yellow mat to your gray. Add your frog diecut. Place flowers on mat and emellish each with rhinestones.
You're done! And voila...the finished project!!

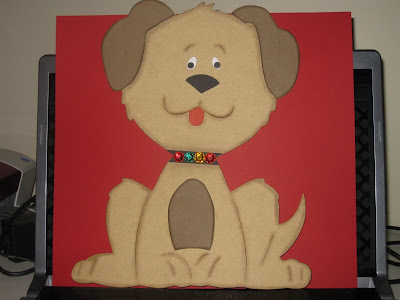
Our project today would be perfect for that friend of yours who has a favorite pooch...or maybe as a sweet journaling card on a scrapbook page of your special pet.
Awhile back, I bought this fun Rusty Pickle paper with the "I love dirt. It is delicious sentiment." I loved it and thought it would be perfect for me since I'm always making dog pages. Well, as it turns out, there is a stamp set that also has that same sentiment (along with many other adorable images). The set looks like this:

As soon as I received my stamps, I couldn't wait to start playing. I choose the dog diecut on the Animal Kingdom cartridge (page 128). I used a dark chocolate as the base for my dog, and a lighter sand color for the layers (size: 3" for both). Once I layered the pieces, I adhered the dog to a white piece of cardstock. Then, using my scissors, I trimmed it so as to leave a slight white border all the way around. I used EK success paper shapers for the black nose as well as the heart on the collar. Then I made accents on my dog using both brown and white pens.
The topper/card base itself looks like this:

Red: 5 1/4 x 4
White: 5 x 3 3/4
Black: 4 3/4 x 3 1/2
Next, we're going to add a mat on which to put our dog diecut. It will be placed more towards the top:

Dimensions:
White: 3 1/4 x 2 3/4
Red: 3 x 2 1/2
Next, I layered my dog on top of the red mat. I also added a little black circle (same punch I used for doggie's nose), one in each of three corners.
My sentiment was placed on a diecut made using the Storybook cartridge. It's the scalloped square on page 47. In order to make this shape, here is what you do:
First, load your cartridge, and place your overlay over the keyboard.
Turn your machine on. Place your mat (with the white cardstock on it) up to the rollers on your machine. Hit "load paper".
Push your Accent Blackout button until it lights up.
Push the shift then "T" button.
On the right hand side, is your dial for the size, turn it to 1 3/4 ".
Then hit "cut".
Now, remove your white cardstock from your mat, and replace it with some red. Load your paper in the same way you did before.
This time, turn your dial size on the right to 2 ". Push the "repeat last" button. Then cut.
Stamp your sentiment on your white scalloped square. I like to use the Versafine Onyx Black as it gives a nice clean, crisp image. Now you should have two pieces that look like this:

Adhere your sentiment onto your red scalloped paper. Before placing that on your topper, cut a small strip of white cardstock measuring 1/4 x 3 1/2 ". Adhere this toward the bottom portion of your card (see picture below). Then place your sentiment on top of it. Because I am not crazy about using ribbon, I added some little black circles to my white strip using a black pen. This gives the illusion of polka dot ribbon.
Here is a look at the finished project:

Hope you enjoyed today's project! Please feel free to leave a comment! I'd love to hear your feedback! Thanks!
Hope you're having a great day so far! I have some fun ideas for my blog and wanted to share with you so you can be on the lookout for them.
First, a regular feature called "Cricut Creations" is going to be added to my blog. I'll be giving you a list of supplies I used as well as dimensions so that we can do some fun projects together. How does that sound? The projects could be anything from homemade greeting cards to actual layouts. Subject matter will change from one project to another so I can't give you specifics at this time. What I CAN tell you, is these projects will be cute so I hope you'll stop by often to check them out (and maybe even particpate)! I've heard many of you say you have a Cricut machine but have not used it much. I hope this new addition to my blog will inspire you to dust off your "bug" and show it the love it deserves! LOL
Also, in the coming weeks, there will be a change (maybe several) to the appearance to my blog. It may be subtle, so you'll have to pay careful attention. At some point I'm going to ask you what that change or changes were...and someone with the correct answer will win a prize!! So, keep a watchful eye now that I've given you a heads up! :o)
I decided to update my blog with a new look. The Sesame Street characters you see are in honor of our new class series at the Shoppe. You can expect the characters featured here to be included in our classes (as well as some other favorites). It's going to be lots of fun! There is still time to sign up for the first in our series: Oscar the Grouch!
Our "Bug-a-Boo" class is now completely sold out. A big thanks to all who signed up!! :o)
Wishing you all a great day!!
Just a quick update to let you know that there is only one spot left for next Saturday's Lil' Bug-a-Boo class. You can also order a class kit if you're not able to make it to class. Also, sign ups have already begun for the Oscar the Grouch pages. Please call (706) 321-0202 or drop by if you'd like to sign up.
Hope to see you there!
Our first class in our Sesame Street series will feature that grumpy ol' grouch that we all can't help but love. That's right...Oscar! Here is a peek at what we'll be making in class:
First, a close a close up of Oscar:


Finally, here is a picture of the entire layout.

I'm setting up a new poll in an effort to gain some support for my "cause". You see, it's like this:
Every time I go shopping I see these neat scooters at the front of the store. Walmart has them, Winn Dixie, Target...you get the idea. They're pretty much everywhere tempting me with their little bells and lots of fun buttons.
Hubby is not feeling the necessity of my trying out one of these. In fact, he thinks it's a bad idea. Now I ask you...just because there was a little incident years ago involving a ride on lawn mower and some flowers...does that mean I should be banned forever from all motorized vehicles? Of course not...these things happen, right?
So, I'm taking a poll. I'm sure someone out there in blogger land needs a review of these scooters. And if that were the case...how could I possibly refuse? After all, it would be for the greater good. ;o)
Who here loves Elmo? How about Cookie Monster or Oscar the Grouch? Well, if you do, we have a treat for you!!!!

Rejean loves t-shirts so I'm always on the lookout for some funny ones. Awhile back, I found this great website called Cafe Press. In fact, I liked their shirts so much, I ended up getting a couple for myself. I guess before I continue on I should tell you two things: First, I consider myself very blessed and am thankful for who God created me to be. And that includes my disability. Second, I have a wacky sense of humor.
Anyway, on with my story:
I found two t-shirts that I considered "must haves". One read: "The only disability in life is a bad attitude." Love that! The other is probably my favorite. It has a wheelchair symbol and reads "In it for the parking".
I wanted to get one other, but alas, it was not to be... it only came in children's sizes. It said "I walk when no one is looking". Too funny!
So, if you're interested in a new t-shirt, I highly recommend them. They have a wide variety of other products as well. Their shipping is fast and they provide excellent customer service. A search engine is provided if you're looking for a particular topic. Here is their website:
http://www.cafepress.com/
Happy Shopping!
Since the Make a Wish class kits are now all put together and ready for pick up, I was able to bring home my demo pages! Yay! So, upon arriving home, I decided to do some extra embellishing and quickly got to work.
As colorful as the layout was, I still felt that the photo mats could use a little something more. Now, I know that the photos will be going on the white mats. But for my own personal albums, I find myself doing alot of double mats for my photos. So, I decided to add a bit of extra color before adding it to my own album. And I have to say, I LOVE the result!!
I thought I'd share the before and after:
Before:
After:
And a few close ups:
Page 1 before: Page 1 after:
 Page 2 before:
And Page 2 after:

If any of you would like to add these extra mats to your layout, all I did was measure each block and make the inner one approximately 1/4" smaller. I say approximately, because I wasn't real exact about dimensions (those who know me will find this quite shocking. LOL!). Then, I chalked the outside of each mat before adhering to my pages.
I hope this post has inspired you to dig out your scraps and see what ways you can embellish your pages further. And if anyone would like to do this but would like the exact colors that I used in the class kit, I know Cheryl still has some in stock.


